maanantai 5. helmikuuta 2018

Arduino Nano Powered Space rocket

It's been a while since I last time played with Arduino. I got nice idea before Christmas that I would like to create a space rocket which is powered with Arduino for a kid. Original idea was to make it inside kitchen roll, but eventually I decided to do it inside 1,5 liter Coca-Cola bottle. The project started about getting all the equipment I would need.

1. Arduino Nano (small enough)
2. Wires
3. LCD Matrix
4. Buttons
5. Power (9v battery case)
6. Led lights
7. Buzzer
8. Resistors

I wanted the spaceship to have cool blinking led lights, play some audio and also something to "toggle". I decided to do the toggle with button and LCD matrix. Project started by trying the Tone library on my Arduino Uno as it is easier to connect cables in it. I found some cool star wars songs for the tone library and decided to use "the cantina song" as my space ship sound. I have explained how to use the tone library in the previous post, but basically it is just like this:

tone(pin, frequency, duration)

I found Star Wars Cantina song from Google Docs file someone had uploaded so I decided to upload it to GitHub, find the song here: https://github.com/shnigi/arduino-space-ship/blob/master/Star_wars_cantina_song.ino

After checking with Arduino Uno that my program works I started to assemble everything. First I had to solder those small pins on the Arduino Nano board. I had to be very careful not to overheat the pins as it can break the whole board.


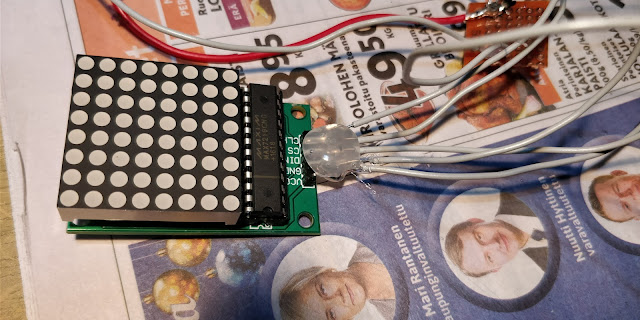
Then I connected LCD matrix


Soldering station.
Connecting the LCD module was pretty easy with 5 different pins. To operate the module you will need LedControl library: https://github.com/wayoda/LedControl led matrix patterns can be generated online: http://robojax.com/learn/arduino/8x8LED/ Basically it is just a 1 for ON and 0 OFF. And then it can be written to the LCD as an array.


byte ALL[8]={B11111111,B11111111,B11111111,B11111111,B11111111,B11111111,B11111111,B11111111};

void writeMatrixAll() {
  for(int i=0; i<8; i++){
    lc.setRow(0,i,0);// this is for blank
  }

  for (int i=0; i<8; i++){
    lc.setRow(0,i,ALL[i]);
  }
}

You define which leds on each row should be turned on, then clear the display first and after that just loop through all the rows and turn on lights. 

I wanted the space rocket to have 9V battery as its power source since its pretty easy to find such batteries. I also happened to own a 9v battery case with proper wiring and a button to turn on or off.


Arduino Nano can be powered with 9V battery by connecting the cables to Ground and VIN = Voltage In. I also added a button to control the led matrix. Because Arduino is only a stupid circuit controller and can basically do only one thing at a time, I created the code so that between the notes I will check if the button variable has changed. Whole code is available on GitHub: https://github.com/shnigi/arduino-space-ship/blob/master/Avaruusraketti.ino

After soldering everything together I added some hot glue to parts which needed more strength. 


Also a red led light was put on the top of the soda bottle. After everything was glued and soldered I started to put everything inside the bottle and strenghtened it with a styrofoam support structure. 


Buzzer, LCD matrix, button, 9V battery, led light and Arduino Uno inside 1,5 liter plastic bottle. Finally I just taped to bottom back to its place and decided to add some cardboard wings to make it super cool.


The rocket is now assembled and decorated, ready for painting. 


And after painting its a nice silver rocket which makes Star Wars sound and has LCD led display!


As you can see the button doesn't work all the time as the variable checking is done between the notes. It is anyway good for a kid =)

Parts: about 20$
Programming: 2-3 hours
Finding tutorials: button and LCD matrix, 6 hours
Source code: https://github.com/shnigi/arduino-space-ship/blob/master/Avaruusraketti.ino

sunnuntai 31. maaliskuuta 2013

Course finished - all kind of projects

Arduino course is now finished and I hope that I will write here again some day. Here are some projects our course did.

First on is push-up counter. It uses ultrasonic sensor to detect how close the doer is. Then it counts the amount of push-ups to the digital screen. It can be restarted with button. Simple, but works. No idea if someone needs this or not ?


Second one is some kind of watch tower or big brother tower. It turns 180 degrees and scans the area. If it detects movement, it stops and turns a led light on. The original idea was to make kitchen lights turn on and off automatically.


Third one was interesting. A robot hand. It is made of plastic bottle and cardboard. Every finger is connected to one servo motor with a thread and when it moves the hand "grabs". The hand-guy first tried to make a 3D print of hand but it failed because software incompatibilities. 


Last one was a flashlight button tester. It can be set to push forever the flashlight button, it tests if the light turns on and if not it calculates it as error. It didn't save any log file yet but it was under work. Very useful tool for flashlight producers i'd say.


And my robot hat, teacher liked it. I got 4,5/5 points. That was very nice.

perjantai 8. maaliskuuta 2013

Final project, hat with ultrasonic sensor and sound warning

As my final project I got an idea about a hat which can talk to the user and guide example a blind guy to the right way and not to crash anything. Or one could solve a maze in complete darkness because the ultrasonic sensor. I first tried to make Arduino say something but it didn't succeed. Then I eased my project and thought maybe same kind of noise what car rear-view cameras make. I found Arduino Tone library. With that I managed to make Arduino Beep! Then I found a broken headset. I ripped the speaker elements out of it and soldered two wires to it. Then I connected the ultrasonic sensor which I got earlier hc-sr04 to Arduino, tested if it works and can measure the distance. I coded it to check if the distance is between three ranges. If the range is shorter than 30 centimeters it will beep very fast and warn the user that you are going to crash. If the distance is between 31 and 60 centimeters it will beep normal speed and it tells that it is safe to turn. If the distance is between 61 and 90 it beeps very slow to warn that you are approaching an obstacle. If the distance is bigger than 90 it stays silent. I think this was very fun project and of course interesting. Thanks to Tero Karvinen i'm now very excited about the Arduino and its possibilities. And then about the project.

I first started to code the project by one piece at a time. First the ultrasonic sensor, then the beep sound and then connected those together. Here i'm currently in test environment.


Next I had to hot glue all the parts to an old peaked cap and solder few wires together.


Then I tested if the parts still work without computer test environment and it didn't. I had to change the speaker connection a little bit and then it worked. Here is the final ultrasonic hat. The battery plus wire was too short but it is just long enough to work.

Testing phase for distance and beep to function correctly together.


And here it is. The final version of my prototype hat for the blind people or drunk people or what ever.


And how I coded it ? Here is the whole code.

Connection like in ultrasonic sensor post and tone post. hc-sr04 vcc to +5v, gnd to gnd, trig to pin 12, echo to pin 13. Speaker element goes to ground and digital pin 8.

//define the pins for ultrasonic sensor here
#define trigPin 12
#define echoPin 13

//setup trig is output and echo is input for the sound. Read serial fastest possible speed
void setup() {
    Serial.begin (115200);
  pinMode(trigPin, OUTPUT);
  pinMode(echoPin, INPUT);
}

//below methods for beep speed
void beepFast(){
   // play a note on pin 8 for 200 ms:
  tone(8, 440, 200);
  delay(50);
  // turn off tone function for pin 8:
  noTone(8);
  delay(300);
}

void beepSlow(){
  tone(8, 440, 200);
  delay(500);
  noTone(8);
  delay(300);
}

void beepMedium(){
  tone(8, 440, 200);
  delay(200);
  noTone(8);
  delay(300);
}

//no beep here
void beepNo(){
  noTone(8);
  delay(300);
}

//send a pulse and calculate how long it took to travel
void loop() {
   int duration, distance;
  digitalWrite(trigPin, HIGH);
  delayMicroseconds(1000);
  digitalWrite(trigPin, LOW);
  duration = pulseIn(echoPin, HIGH);
  distance = (duration/2) / 29.1;

//then check the distance and beep if it is in the range
   if (distance >= 200 || distance <= 0){
    Serial.println("Out of range");
  }
  else if (distance >=0 && distance <=30){
    beepFast();
    Serial.print(distance);
    Serial.println(" cm");
  }
else if (distance >=31 && distance <=60) {
  Serial.print(distance);
    Serial.println(" cm");
beepMedium();
}
else if (distance >=61 && distance <= 90){
  Serial.print(distance);
    Serial.println(" cm");
beepSlow();
}
else {
   beepNo();
     Serial.print(distance);
    Serial.println(" cm");
}

}

And the guy behind this blog and random hat project...


Testing phase. She managed to walk to the door from kitchen and back. Succeed.


The project was fun to do and i'm proud that I managed to complete it. One thing more to add my portfolio.

torstai 7. maaliskuuta 2013

Arduino DC motor car, total fail

Because I got the dc motor work with Arduino I thought maybe I should build a car. The idea was good but the actual car was bad. DO NOT build a car with weak dc motor. It runs very slow because the DC motors are so weak and the controlling of motors is also bad. Anyway here is a picture and a video to demonstrate it. I'm not even using Arduino because I just wanted to know if the motors are good for this kind of project. And the answer is definitely no.


As you can see it didn't even have enough power to run on carpet...

Arduino Tone

I discovered that Arduino can play simple beep sounds without anything special. I ripped the speaker element from old headphones, soldered two wires to it and connected to arduino GND and digital 8 through 100ohm resistor. It played continuous beep sound... was pretty fun.


Found the code from here: http://arduino.cc/en/Tutorial/Tone4

bEEp! bEEp! bEEp! bEEp! bEEp! bEEp!


void setup() {

}

void loop() {
   // turn off tone function for pin 11:
   noTone(11);        
  // play a note on pin 6 for 200 ms:
  tone(8, 440, 200);
  delay(200);

  // turn off tone function for pin 6:
  noTone(8);
delay(300);

}

Voice Record Module – ISD1820

Today I tested voice recording module ISD1820, which can record up to 20 seconds sound and then play it through speaker.

Connection setup was pretty easy. Microphone to + and -, and others can be looked from the code.

This code is for PIR sensor. It should work as and alarm system, despite the fact that I don't have PIR I used this code and it worked out of the box. 

Just press record button and say something, then push playe to hear the sound. 

Original project: http://www.elecfreaks.com/2215.html 


And video to demonstrate that it works.


#define SOUT 12
#define REC 8
#define PLAYE 9
#define PLAYL 10

void setup(){
pinMode(SOUT, INPUT);
Serial.begin(9600);
}

void loop(){
int ret = digitalRead(SOUT);
if(ret == 1)
{
Serial.println("--------------> PIR");
digitalWrite(PLAYE, 1);
delay(5000);
digitalWrite(PLAYE, 0);
}
}

Controlling 5v DC motor

To control small DC motor you will need:
motor, max 5v
PN2222 Transistor
1N4001 diode
270 Ω Resistor (red, purple, brown stripes)

Connection scheme:


 Add this code to arduino. You can control the speed of motor by sending values between 0 - 255 from serial monitor. However i noticed my DC motor doesnt work if the speed isn't between 150 - 255.


int motorPin = 3;
void setup()
{
pinMode(motorPin, OUTPUT);
Serial.begin(9600);
while (! Serial);
Serial.println("Speed 0 to 255");
}
void loop()
{
if (Serial.available())
{
int speed = Serial.parseInt();
if (speed >= 0 && speed <= 255)
{
analogWrite(motorPin, speed);
}
}
}

Project found from: http://learn.adafruit.com/adafruit-arduino-lesson-13-dc-motors/overview